
In the ever-evolving landscape of technology, staying ahead of potential issues and ensuring the smooth functioning of your operating system is paramount. Windows 11, the latest iteration of Microsoft’s iconic operating system, brings a range of new features and improvements. One crucial aspect for users is the ability to enable emergency restart, ensuring that the system can be efficiently rebooted when needed. In this guide, we will explore the steps to enable emergency restart in Windows 11, offering users a comprehensive solution for managing their system updates and ensuring optimal performance.
Yes, there are other ways to deal with a computer that is stuck for a while; you can restart the Windows Explorer Process, End task the unresponsive app, or simply long press the power button to force shutdown.
However, what if we tell you that Microsoft hides an Emergency Restart feature on the CTRL + ALT + Del screen? You might have reached the CTRL + ALT + Del screen many times, but we are sure you haven’t noticed the Emergency Restart option.
Understanding the Need for Emergency Restart:
Before delving into the step-by-step process of enabling emergency restart in Windows 11, it’s essential to understand why this feature is crucial. Emergency restart is particularly useful during critical situations, such as system updates or installations, where an immediate reboot is required. By enabling this feature, users can ensure that their system can restart promptly, minimizing downtime and potential disruptions to productivity.
Step-by-Step Guide: How to Enable Emergency Restart in Windows 11:
Note: Ensure that you have administrative privileges on your Windows 11 system before proceeding with the following steps.
Method 1: Using Group Policy Editor (For Windows Pro and Enterprise Editions):
- Press
Win + Rto open the Run dialog box. - Type
gpedit.mscand press Enter to open the Group Policy Editor. - Navigate to
Computer Configuration -> Administrative Templates -> Windows Components -> Windows Update. - Locate the policy named “No auto-restart with logged-on users for scheduled automatic updates installations.”
- Double-click on the policy, select “Enabled,” and click “Apply” to save the changes.
This method leverages the Group Policy Editor, providing granular control over various Windows settings. It is especially beneficial for users with Windows Pro and Enterprise editions, where the Group Policy Editor is readily available.
Method 2: Using Registry Editor:
- Press
Win + Rto open the Run dialog box. - Type
regeditand press Enter to open the Registry Editor. - Navigate to
HKEY_LOCAL_MACHINE\SOFTWARE\Policies\Microsoft\Windows\WindowsUpdate\AU(create the WindowsUpdate and AU keys if necessary). - Look for a DWORD value named
NoAutoRebootWithLoggedOnUsers. - Set its value to
1to disable automatic restarts. If the entry doesn’t exist, create it.
This method involves directly modifying the Windows Registry, providing another avenue for users to customize their system settings. However, caution is advised when editing the registry, as incorrect changes can impact system stability.
Method 3: Using Windows Settings (For Windows 11):
- Open the Settings app (
Win + I). - Navigate to “Update & Security” and select “Windows Update.”
- Click on “Advanced options.”
- Under the “Choose how updates are installed” section, find the option “Restart this device as soon as possible when a restart is required to install an update.” Toggle it off.
For users who prefer a more user-friendly approach, the Windows Settings method provides a straightforward way to manage system restart preferences. This is particularly useful for those running Windows 11 Home edition, which may not have access to the Group Policy Editor.
Other Ways to Restart Windows 11?
Using the Emergency Restart feature on Windows 11 is very easy; you need to know the right way of accessing the feature. Here’s how you can use the Emergency Restart on Windows 11 computer.
- If your PC isn’t responding, press the CTRL + ALT + Del button on your keyboard.

2. This will open the screen from where you can restart your device. The screen will also show a few other basic options.
3. Now, to use the Emergency Restart feature, press and hold the ‘CTRL‘ key and click on the Power button.
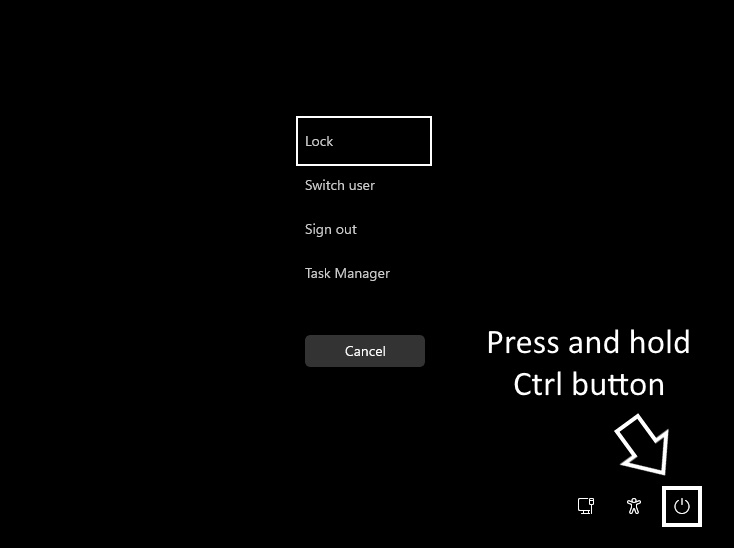
4. Now, you will see the Emergency Restart screen. You need to click the OK button to restart your computer.

That’s it! Once you press the OK button, your system will terminate all running processes & forcibly reboot. This won’t save any of your work.
Conclusion:
Enabling emergency restart in Windows 11 is a valuable customization that allows users to have more control over their system’s reboot behavior. Whether utilizing the Group Policy Editor, Registry Editor, or Windows Settings, users can choose the method that best suits their preferences and technical proficiency. However, it’s crucial to strike a balance between preventing unexpected restarts and ensuring that your system remains updated and secure.
As technology continues to advance, staying informed about the latest features and customization options empowers users to tailor their computing experience to meet their specific needs. With this guide, you are now equipped with the knowledge to enable emergency restart in Windows 11, enhancing your control over system updates and optimizing the performance of your operating system.